
GitHub+Hexo 搭建个人网站
什么是 Hexo?
Hexo 是一个快速、简洁且高效的博客框架。Hexo 使用 Markdown(或其他渲染引擎)解析文章,在几秒内,即可利用靓丽的主题生成静态网页。
获得个人网站域名
阿里云购买一个域名
GitHub 创建个人仓库
创建新的仓库,用户名.github.io 这个用户名使用你的GitHub帐号名称代替,比如我的仓库名为:liuilin.github.io
安装 & 配置 Git
wsl 的 scoop 安装 Git
1 | git config --global user.name "你的GitHub用户名" |
-
在本地创建 GitHub 仓库
-
进入 blog 目录,逐行复制命令到 gitbash 运行
1
2
3
4
5
6echo "# blog" >> README.md
git init
git add README.md
git commit -m "first commit"
git remote add origin https://github.com/GitHub用户名/blog.git
git push -u origin master -
如果上面最后一句出现失败:是因为缺少 SSH Key
Google:GitHub ssh key 复制命令
ssh-keygen -t rsa -b 4096 -C "your_email@example.com"接着输入
cat ~/.ssh/id_rsa.pub把打印的值添加到 GitHub个人 的 Personal settings/SSH and GPG keys 的新建中(或者把 id_rsa.pub 的值复制到 GitHub 新建的 new SSH Key 中),然后运行失败的 git push -u origin master不用 hexo ,而是使用 GitHub Pages 的情况:
新建 index.html ,进入 Settings 的 GitHub Pages ,将 Source 改为 master branch 。保存后再次拉到此处把新出现的网址复制,点击顶部的项目,点击Edit输入网址保存。这样就可以点击网址访问首页了
-
检测GitHub公钥设置是否成功,命令行中输入 ssh git@github.com
1
2
3
4PS C:\Users\Daniel\blog> ssh git@github.com
PTY allocation request failed on channel 0
Hi liuilin! You've successfully authenticated, but GitHub does not provide shell access.
Connection to github.com closed.如上则说明成功。这里之所以设置GitHub密钥原因是,通过非对称加密的公钥与私钥来完成加密,公钥放置在GitHub上,私钥放置在自己的电脑里。GitHub要求每次推送代码都是合法用户,所以每次推送都需要输入账号密码验证推送用户是否是合法用户,为了省去每次输入密码的步骤,采用了ssh,当你推送的时候,git就会匹配你的私钥跟GitHub上面的公钥是否是配对的,若是匹配就认为你是合法用户,则允许推送。这样可以保证每次的推送都是正确合法的。
安装 Node.js
Windows 用 scoop 安装 node
检测Node.js是否安装成功,在命令行中输入 node -v
检测npm是否安装成功,在命令行中输入npm -v
安装Hexo的环境搭建完成
安装 Hexo
创建一个文件夹随意命名,如 Blog , 以后 Hexo 框架发布的网页都在这个文件夹中
使用npm命令安装Hexo,输入:
1 | npm install -g hexo-cli |
这个安装时间较长耐心等待
安装完成后,初始化我们的博客,输入:
1 | hexo init blog |
wsl 下查看 blog 第一层级:tree -a -L 1
1 | . |
在我们初始化的一个 blog 文件夹中,为了检测我们的网站雏形,分别按顺序输入以下三条命令:
1 | hexo new '博客名' |
部署后访问 localhost:4000 查看本地
常用命令
1 | 现在来介绍常用的Hexo 命令 |
更换主题
在 blog 目录中更换主题 next/inside (比较喜爱的两个主题),此目录下打开命令行输入:
1 | $blog: git clone https://github.com/ikeq/hexo-theme-inside.git themes/inside |
将主题下载到 blog 目录的 themes 目录下,打开站点的 _config.yml 文件中的配置为 theme: inside(下载的主题名字)
图床
创建一个图床仓库 image-bed ,分支名要设 GitHub 能看到的分支
使用 jsDelivr CDN 对 GitHub 图床进行加速,PicGo 配置自定义域名
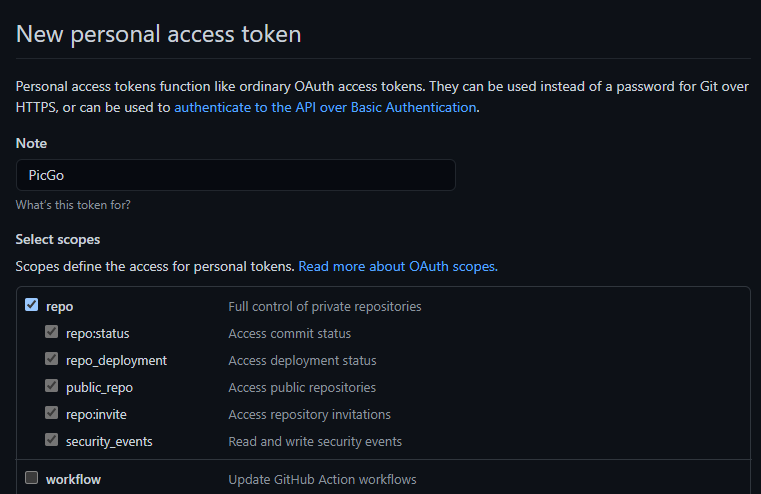
在目录 Setting / Developer Settings / Personal access tokens 下获取 GitHub Token :
点击 Generate new token
输入 Note 及勾选 repo,生成后复制 token 进 PicGo 的设定 Token 中
GitHub 仓库的容量有 1G 的上限,但对个人博客来说绰绰有余
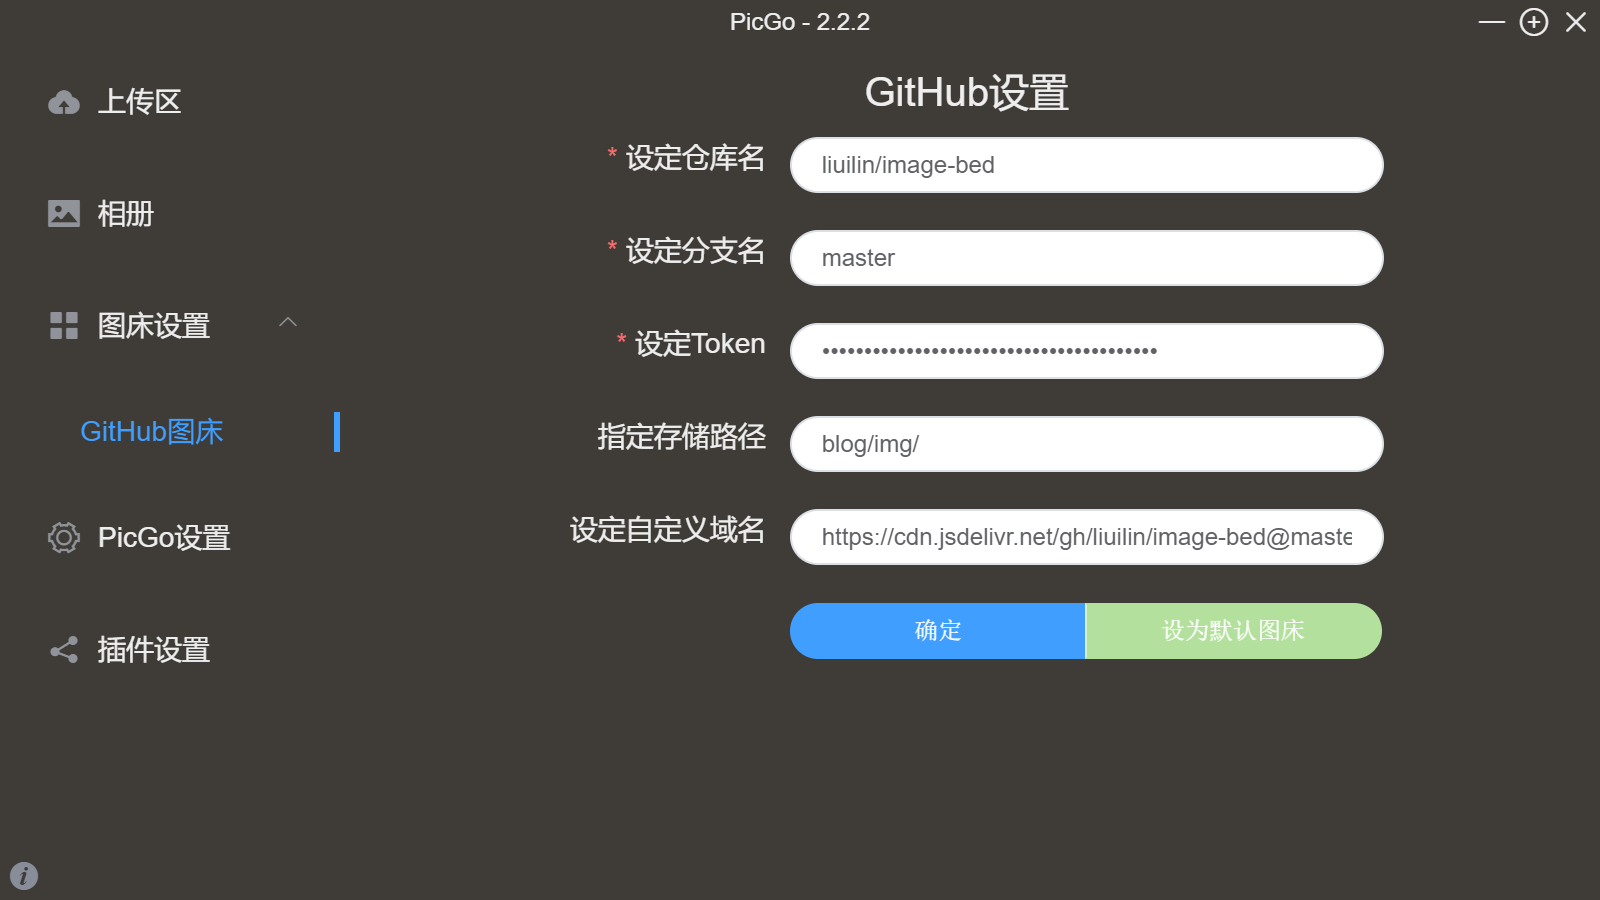
设置参数说明:
- 设定仓库名:填入你上面创建的仓库名,格式为:用户名/仓库名;
- 设定分支名:一般填写 master 即可;
- 设定 Token:将上一步 GitHub 配置中得到的 Token 粘贴进去;
- 指定存储路径:图片在 GitHub 仓库中的存储路径,例如:blog/img/
- 设定自定义域名:此处直接设置 jsDelivr 加速的访问地址,例如:自定义域名设为 https://cdn.jsdelivr.net/gh/liuilin/image-bed@master 来进行 CDN 加速(https://cdn.jsdelivr.net/gh/ 不能省略,gh 为 GitHub 缩写,后面接 GitHub 名字 + 仓库 + @仓库branch)
- gh:固定写上,为 GitHub 缩写,表示来自 GitHub 的仓库
- liuilin/image-bed:仓库的具体位置
- master 仓库的分支
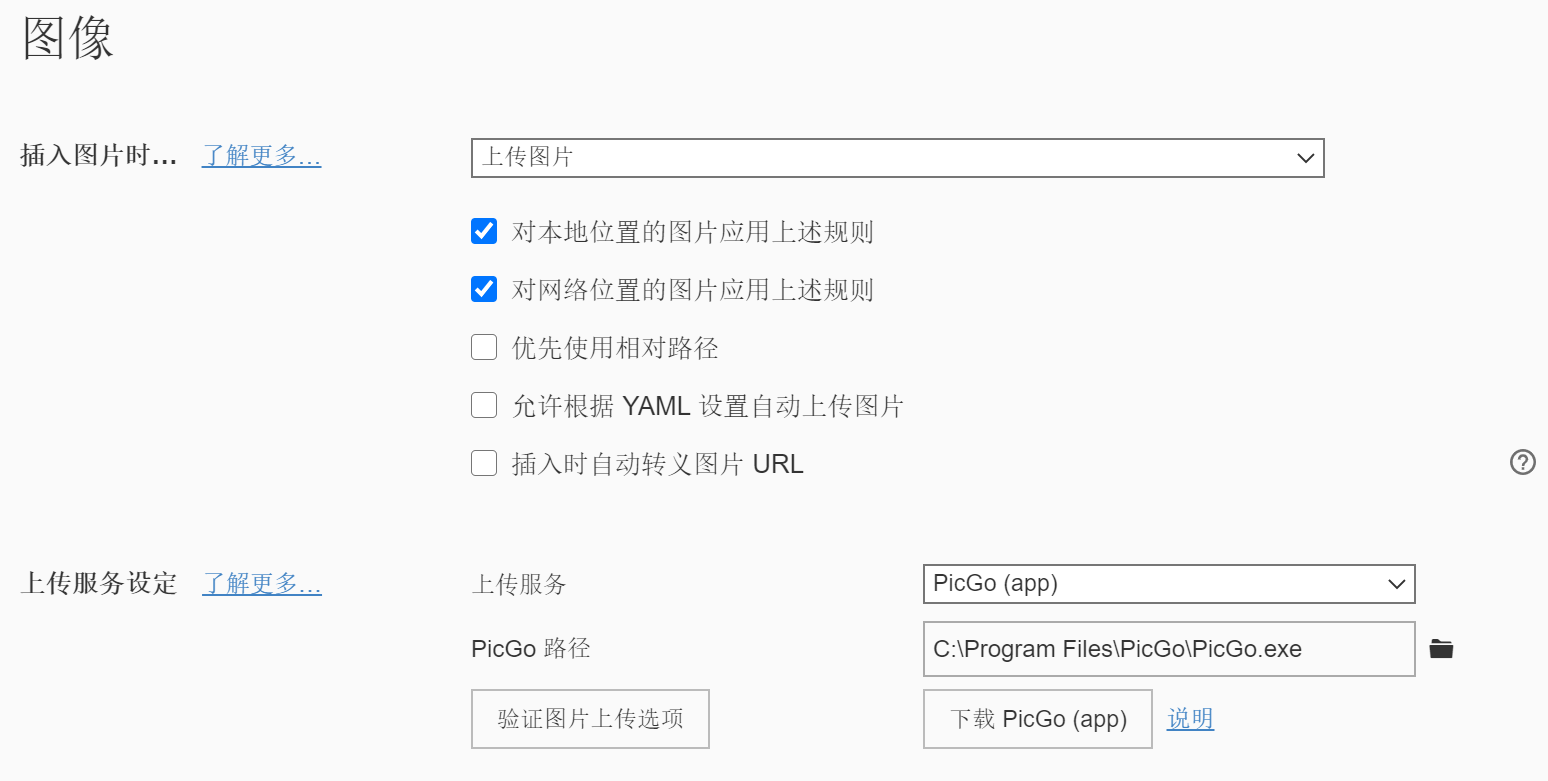
PicGo 配置完成后在 Typora 设置中 PicGo 程序路径,然后将图片粘贴到 Typora 里的 markdown 文件中就会自动上传到 GitHub
使用 jsDelivr 优势
使用 jsDelivr 加速静态文件访问,能够优化博客体验。
在 GitHub 存储图片,利于博主对于图片的掌控。
使用 PicGo 的原因是因为能够方便地将上传图片到 GitHub,并直接获取 jsDelivr 的加速后的图片地址。
推送
推送新写的博客内容到 GitHub
在 blog 目录下找到 _config.yml 文件,在最后加上如下配置:
1 | deploy: |
hexo d 进行博客部署,让 hexo 知道把博客 blog 部署在GitHub哪个位置
最后安装 Git 部署插件,输入命令:npm install hexo-deployer-git --save,有了该插件则可以将 blog/public 的内容推送到 GitHub 上。
这时,我们分别输入三条命令:
1 | hexo clean |
现在输入 用户名.github.io 就可以在浏览器上访问了
绑定域名
虽然在 Internet 上可以访问我们的网站,但我想使用自定义域名,这就需要绑定我们自己的域名。我阿里云购买了一个域名 liumulin.top

主机记录值为前缀
@ 代表访问时不用前缀,直接输入 liumulin.top
www 代表访问时输入 www.liumulin.top
blog 代表访问时直接输入 blog.mortalpro.com
以上访问的全是自定义的记录值 用户名.github.io
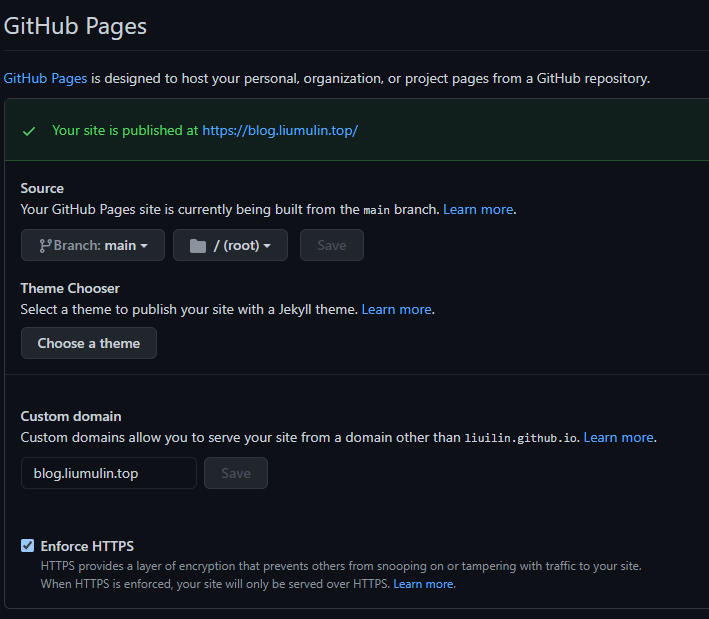
包括添加三条解析记录,192.30.252.153是GitHub的地址,你也可以ping你的 http://xxxx.github.io 的ip地址,填入进去。第三个记录类型是CNAME,CNAME的记录值是:你的用户名.http://github.io 这里千万别弄错了。第二步,登录GitHub,进入之前创建的仓库,点击settings,设置Custom domain,输入你的域名
在 用户名.github.io 这个仓库中更改 GitHub Pages 配置的 Custom domain
完成域名配置后,点击save保存。进入 本地博客 文件夹,接着进入 blog/source 目录下,将想要访问的地址放入 CNAME 中(如:echo “bloag.liumulin.top” >> CNAME)。然后在博客文件夹下执行以下命令
1 | hexo clean |
这时候打开浏览器在地址栏输入你的 自定义域名 将会直接进入你自己搭建的网站
个性化设置
在博客站点配置文件 blog/_config.yml 修改基本的站点信息
1 | # Site |
修改主题配置文件 blog/theme/ 下载的主题 /_config.yml
1 | reward: |
博客打赏的微信、支付宝二维码图片,放在根目录 blog/source 文件夹下
社交sns
1 | sns: |
自定义搜索 API
1 | adapter: |
将需要上传至github的内容放在source文件夹,例如CNAME、favicon.ico、images等。
FAQ
-
hexo d 推送不上去
1
2
3
4
5
6
7
8
9
10fatal: unable to access 'https://gitclone.com/github.com/liuilin/liuilin.github.io.git/': The requested URL returned error: 504
FATAL {
err: Error: Spawn failed
at ChildProcess.<anonymous> (C:\Users\Daniel\blog\node_modules\hexo-util\lib\spawn.js:51:21)
at ChildProcess.emit (node:events:376:20)
at ChildProcess.cp.emit (C:\Users\Daniel\blog\node_modules\cross-spawn\lib\enoent.js:34:29)
at Process.ChildProcess._handle.onexit (node:internal/child_process:284:12) {
code: 128
}
} Something's wrong. Maybe you can find the solution here: %s https://hexo.io/docs/troubleshooting.htmlGit config 配置了以下加速 GitHub 代码下载配置,导致全局走了这个地址,取消掉此配置(将 v2ray 开启全局代理,Git config 配置https.proxy=socks5://127.0.0.1:10808)即可解决
url.https://gitclone.com/github.com/.insteadof=https://github.com/
还有一种方案,hexo clean 之后重新 hexo d 部署
-
Typora 上传图片失败